Sunday, January 30, 2011

Documentation - Right Now

I started scrapbooking as a way of recording details many years ago. My scrapbooking has evolved quite a bit from that starting point but record keeping is certainly my number priority. My memory is terrible. As a mom to three little ones, I am constantly amazed at how quickly time is escaping. As a stay at home mom, my days often seem long and yet when I look back the years have flown by. There are so many little moments each day that tell so much about who we are. While I can't slow down time, I try to record as many of the details as possible.

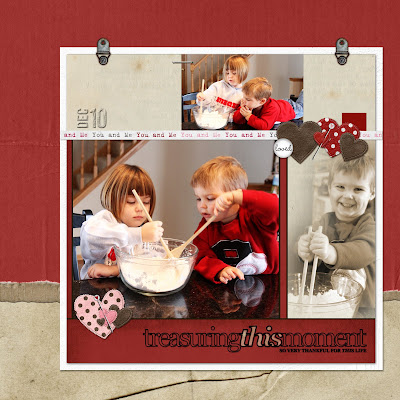
The page below is one example of my way of recording some of the details. Once a year, I sit down for about 20 minutes and write as much I can think about my child at that particular stage...the little stuff that probably wouldn't make it onto a page and I would easily forget.

their height/weight
what they like to eat for breakfast?
what causes meltdowns?
what books are they reading?
what toys are they playing with?
what do they like to do in the morning?
what is the nighttime routine?
what funny things they say?
what do they like to wear?
where do they like to go?
what shows do they like to watch?
who do they like to play with?
what is challenging about this age?
what is wonderful about this age?
what qualities do you see emering?

It has been so fun to look back and when I do there are so many things that bring me back to the moment...things that would have escaped me and them if I hadn't recorded them. If you haven't done so already, give it a try. I know you will appreciate it down the road.


Thursday, January 27, 2011

This Story Touched My Heart

Ten years ago a plane carrying part of the Oklahoma State basketball team crashed and killed ten people. I remember when this happened. My husband came home from work yesterday and said you have to read this article. The story is amazing and powerful. There are many valuable lessons to be learned about parenting, attitude and time in this tragic story. It certainly touched my heart in so many ways. I hope you take the time to read it. The article can be found here.

Have a wonderful weekend!

Tuesday, January 25, 2011

Digital U - Setting the Mood

One of the many things that I LOVE about digital scrapbooking is that you can take any photo and change the mood all together with a few simple techniques. I am not a photographer. I wish I was. It is something that I am always working on. However, I know that when I am photographing my children, I find great reassurance in knowing that I have Photoshop in my toolbox at home. Photoshop is soooo powerful and yet, you don't have to be a wizard at Photoshop to make your photos shine. The important aspect of creating a page is to look at the strengths of your photo and work from there.


Example 1:

Color conversion is a tool that I use alot. I love to use sepia and black/white combinations to give a piece more interest. I took this photo of my daughter and my son last week. I love the photo because it is just a little glimpse into the love they have for one another. However, I wasn't a big fan of the colors in the photo. I switched the image to black and white and started from there.
This is the final page. I think the "feel" of it is significantly different than the photo that I started with. It is much more dramatic than the original.


Example 2:
I love this picture that I took of my daughter but again, I wasn't a big fan of the colors. I wanted to soften her up a bit so I converted the photo to a combination of color and sepia while leaving her eyes the true color.
This is the finished project. I think the color conversion really creates a soft feel to the page.

Example 3:
We were outside playing in our front yard, the chemical truck came to treat our yard. I had to run inside for a moment and I told the kids to stay in the garage. When I returned to the garage, this is how they were sitting, it took my breath away. I love the idea behind the photo but the photo itself lacked a lot of things so I converted them into a silhouette.

In the page, I share the story, that I just shared with you. I like how powerful this page is. Their image takes center stage. This is the same image that I used on my blog header although it is flipped.

Example 4:
My sister-in-law took this picture of my son. It sure is nice having a photographer in the family. My favorite part of this picture are his eyes. He looks so fearful. I don't think I have ever seen this look from him before. When I created the page, I wanted to keep his eyes as the focal point of the image and cropped him accordingly. I took an awesome digital art class at http://www.debbiehodge.com/ that was taught by Pattie Knox, one of the designers at Designer Digitals. This particular class focused on adjusting thresholds.
This was the final page created from the photo above. After changing the photo to sepia, I adjusted thresholds around his face and kept his eyes as they were in the photo. This is one of my favorite pages that I have ever done. This page was featured in Somerset Digital Studios Fall issue for 2010.

Example 5:
I will admit that I love the color brown. I love photos in sepia, I love scrapping with brown tones. I think a sepia photos gives the image a timeless feel and I'm a big fan of that. I love this series of photos of my daughter and her grandma reading Junie B Jones on the beach with her grandma's kindle.
Here is the final page. I think the color conversion really adds a lot to the page.

As you can see by these examples, I think there are a lot of little things you can do through digital scrapbooking that make a big impact. I hope you found this helpful. Have an awesome day!
All products are from Designer Digitals.

Monday, January 24, 2011

Project 365 - Week 2 & 3

I'm really enjoying this project again. There are different approaches to this project, some people really focus on the photographs themselves and use it as a tool to improve their photography. Others use it as a diary to keep a record of what they are doing. I would certainly fall into the record-keeping group although one of my goals for 2011 is to improve my photography.

Here is a peek at my second week spread. Some of the photographs are not mine. The team was nice enough to share all of their photographs with each other. I can't begin to tell you how much fun it was to travel with people who shared the same passion for photography and digital scrapbooking. Thanks to the team for sharing their photos with me.

Here is week three which of course will be paired with week four for the spread.


I hope people who started this project are enjoying it as much as I am. I know that years from now, these albums will be treasured.

Sunday, January 23, 2011

Go Pack Go!

This is what dinner looks like in our house when there is a big game on... And there was certainly a big game today and I'm thrilled with the outcome of the big game...the Packers are going to the Superbowl! We have been Packer fans from the very beginning...I should add that when I say "we"...I am talking about my side of the family. Jeff and the kids are total Vikings fans although Mia said she would cheer for the Packers today just because of Grandpa Wayne. My dad waited 33 years for season tickets and loves the time he gets to spend at Lambeau field. I usually go with him once a year to a game. I created the following page after we went to the NY Giants game at the end of December.

We are excited about the victory. Dad really wants to go to the Superbowl but as you can imagine those tickets are hard to come by...we'll see what happens. It will be so fun to see them play for the national championship.
It has been FREEZING here. We just hungout at home most of the weekend which was nice. I hope you had a great weekend.

Wednesday, January 19, 2011

Las Vegas with the Team

I just returned from a trip to Las Vegas. The designers and team from Designer Digitals took a team trip and it was absolutely AMAZING! Designer Digitals has become my second home. The products are wonderful and the people have become like family to me. I feel truly blessed to be apart of it. I can't even begin to tell you how fun it was to meet everybody in real life. There were about 45 of us on the trip and we came together from all over the world....Israel, South Africa, England, New Zealand, etc. It was AMAZING to say the least. A special "Thank you" to Katie and Randy for creating such an incredible community and for making this trip possible.

The weekend was full. We had photowalks and workshops. The best part of the weekend for me was spending time with each other. It was such a special treat to finally be together with so many people that you have come to know and love. Here is a group shot of us.
One of our team members is from Las Vegas and was so kind to show us around. Elena is a gem and I wish we lived near each other. We had a fantastic time going out to Red Rock. The cameras were in full motion. We also took some of our international friends to Target which was a hoot.

I have so many wonderful memories of this weekend that will last me forever. It was very hard to say "good bye" but the trip only confirmed what I have felt for so long hanging out at Designer Digitals....the people are so wonderful and so genuine! It just feels so good to be part of the Designer Digitals family.

Wednesday, January 12, 2011

Tool Time - Embossing

One of my goals for 2011 is to share my passion for scrapbooking with others. I hope that the people that follow my blog will be inspired to tell their story in their own unique way. Today, I finished this page. I used an adorable template by Pattie Knox which will be coming out this weekend at Designer Digitals. One of the cool things about digital scrapbooking is that there are a million little things you can do that make something appear a bit different. On this particular layout, I "embossed" the date to give it a little bit of texture.


I thought I would share how I do this with you. It is a very simple effect to put into place. I should tell you that I use Adobe Photoshop CS2.


1) I attached this beige background paper (Vintage Books No. 1 from Katie Pertiet) to the upper panel of the template by hovering my mouse inbetween the two layers and clicking.


2) Then I placed the date stamp in the layer above the paper.


3) After I had it positioned where I wanted it, I highlighted the layer that contained that paper and went up to the menu and selected "Layer"...."Duplicate Layer".


4) Once that was duplicated, I moved that particular layer of paper above the layer that contained the stamp in my layers palette. I should add that it helps to name these layers


5) Once it was above the layer that contained the date stamp, I again hovered my mouse between the two layers on my layer pallete and clicked the mouse. It will appear as if nothing happened.


6) Then highlight the layer that contains the date stamp or whatever you would like embossed. Once that layer is highlighted, go down to the bottom of your layers palette and click on the icon for "layers style". I used the following values for this particular layout: Drop Shadow (Opacity 72%, Distance 5, Spread 0, Size 5) and Bevel and Emboss (Inner bevel, Depths 100%, Size 5, Soften 0). Once you change these values, your date should be embossed and you can obviously adjust these values to your preference. I hope it worked for you. Let me know if you have any questions.


Here are a couple of other layouts that I used this technique with...


I hope you found this helpful. It really is a simple effect but I think it adds a lot of interest to the piece. Have a wonderful day...happy embossing!

Monday, January 10, 2011

Project 365 for 2011

We are 10 days into Project 365 for 2011. I received my album for 2010 in the mail today from Shutterfly. It is so much fun to look through. Each of the kids looked through it for a super long time and kept calling me over to point out pictures that they had forgotten about. I LOVE that aspect of scrapbooking. It helps all of us remember moments.

For 2011, I decided to use this Template by Anna Aspnes at Designer Digitals. I am using the left side of the template and altered it a little bit to accommodate seven photos for each week. I love Anna's templates because they are clean and the photos are always the focus of her pages. I liked this template because I wanted to have one focal photo and this design worked for me.

I put some pages together using this template so all I have to do each week is drop the photos into the template and change the journaling. It worked so well last year and my goal is to keep it as simple as possible so I finish it. I'm also going to change out the color embellishments each week based on the color palette of my photos but that is also a very simple change to make. Here are a couple of the templates that are just waiting for the pictures and journaling:


Here is my page from Week One of 2011:

My 2010 album was about the little details of our lives. I did not do much with the highlights. One of my goals for this album is to include a page pertaining to our highlights based on the same template. This is a page that I did for Amelia's birthday party. I'm hoping my album is a little more comprehensive this year and includes as much about our lives as possible. Using the same template system should help make this into a manageable task. I'm excited about this project. It is such a treat to hear my kids ask for their albums and relive the special moments that we have shared.

My first spread will look like this...
It has been especially fun going through the gallery at Designer Digitals and seeing who is embarking on this journey as well...there are so many wonderful ideas and fabulous pages out there. This project is very feasible if you have a template in hand and enjoy taking photographs.

I hope you have a wonderful week!

Saturday, January 8, 2011

Amelia's Party

We had Amelia's Fifth Birthday party today. It was supposed to be a Snow Party but when I looked at the temperature this morning it said ZERO....the festivities were moved inside...She has such wonderful friends and the party couldn't have gone any better. It was a special day to celebrate a special little girl.
After I returned from getting her balloons and cake, she pulled a chair over and just gazed at her cake in the box.....soooo sweet!
Her sweet friends...


Tuesday, January 4, 2011

Project 365

One of my goals for 2011 is to use my blog to inspire others to tell their stories through scrapbooking and photography. I could talk about digital scrapbooking all day long. My hope is that these posts inspire, educate and encourage you to document your journey.


I am all about documentation and in all honesty it has become an obsession of mine. I think it is partly because I lost my mom so early in life. I was 21 years old. I was in college. There were so many things that I didn't bother to ask her about that I really wish I would have. Things that were not important at the time but now I would love to know more about...her life growing up...her parents...her grandparents...my childhood...her pregnancies...the list goes on. My passion for preserving as many details about our family life is alive and strong. When I am no longer here, I want my children to be able to look through books and find the details about all of our lives. It is a journey that I have been on for a long time and I find it SO incredibly fulfilling. We have scrapbooks upon scrapbooks at our house both traditional and digital. My husband once joked with me and said "nobody is going to want to marry our kids because they come with so much baggage in terms of scrapbooks (probably the other kind of baggage as well with us as parents) and they will need to have another room in their house just to store them". I think he might be right. It is what it is, I guess.


This year I embarked on Project 365. I took a photo each day and did a page each week with these photos. This book isn't about the highlights of the year...it is about the little details that make up our family life each and every day of 2010. It contains things that I might have forgotten if I didn't write them down. I know that in years to come, this book is going to be one of my favorites...it isn't anything spectacular to look at but it contains the details of our lives...and the saying goes "life is in the details".


I think in a lot of instances, people are intimidated by the whole idea of recording and documenting because it seems like something that would take a lot of time. It really doesn't have to though. I will admit that I was nervous about this project headed into it as well. I knew that if I wanted to keep up with it, I needed to make it simple. I created a basic page using products from Designer Digitals, I took a photo each day and at the end of the week, I plugged the photos in and descriptions and that was it. It took me about 25 minutes each week total. You can easily break the project down into something simple. I will again use a template this year. I'm leaning towards a template series by Anna Aspnes at Designer Digitals but haven't quite narrowed it down yet. This was the format for my individual pages...
It was so fun to see the book come together at the end of the year. This is the finished product. I just ordered it from Shutterfly and it should be here in a few days.Here is the link, if you would like to take a peek at it.
2010 Project 365


I hope you are having a wonderful day. Thanks for visiting my blog!

Monday, January 3, 2011

Amelia's Birthday

Five years ago today our lives got a whole lot sweeter with the birth of Amelia Grace. She has had the sweetest disposition since day one and we feel so incredibly blessed to have her in our world.

All products are from Designer Digitals.